


Get started learning to build your own electronics by following our FREE online courses below!
Learn More »
Categories
- animatronics (12)
- apple (11)
- arduino (179)
- art (41)
- articles (121)
- artificial intelligence (11)
- automation (421)
- avr (205)
- bitcoin (3)
- breadboard (9)
- cameras (57)
- cars (26)
- cell phones (28)
- clothing mods (21)
- console mods (26)
- dangerous (94)
- desktop mods (24)
- embedded (5)
- flying things (54)
- fpga (22)
- gaming creations (108)
- interface (225)
- internet (17)
- laptop mods (6)
- lasers (22)
- linux (7)
- magnetic (3)
- medical (12)
- microcontrollers (51)
- misc projects (152)
- msp (12)
- music (124)
- pic (90)
- projects (23)
- pyroedu (76)
- raspberry pi (26)
- robots (312)
- security (36)
- sensors (307)
- software (200)
- solar (19)
- stamp (9)
- tools (149)
- tutorials (98)
- Uncategorized (45)
- usb (44)
- wireless (256)
Sponsors
Build Like A Pyro!
Find many of the parts used on this site at our favorite online electronics shop

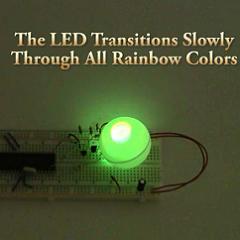
RGB LED Control via PIC
Posted February 9, 2012 by Chris
“A very popular type of LED that has finally come about is the tri-color, RGB LED. The RGB stands for: red, green and blue since the LED is capable of displaying all three colors, independently. This means that an RGB LED can display any color of the rainbow. This is a powerful capability, but it also requires more control. This tutorial explains how to display all the colors of the rainbow on a single RGB LED using a PIC 18F452 microcontroller.”


Temperature to RS232 Converter (Old + New)
Posted February 8, 2012 by Chris
“About 10 times a minute the controller poles each of the three I2C temperature sensors (DS1721) for it’s current temperature. The sensors are the eight pin SMT IC’s on the back of the boards. There is one on the main circuit board. There are two more sensors on the smaller boards. One of the smaller boards is screwed into the incoming air vent and the other is screwed into the vent on a backup AC unit.”

Proximity Sensing Robotics Tutorial
Posted February 4, 2012 by Chris
“In order to move around without becoming stuck or damaged, a robot needs to monitor and respond to its environment. This ability is made possible by sensors triggering certain navigational responses. The sensor robot project has two challenges: You will add a front sensor that will keep the robot from bumping into walls and objects in its path and you will program the robot to execute an avoidance maneuver in response to each sensor.”

PIC18F4620 Embedded Websockets
Posted January 15, 2012 by Chris
“This project enables your MCU to communicate in real time to a web browser. I started this project after seeing a similar implementation on hackaday from mbed.org. Their implementation uses their own device, the mbed Cortex-M0 beta. I’ve been a hobbyist microchip PIC developer for a few years, so I set out to write my own version for microchip’s 8bit pic devices in C. The microcontroller used is a microchip PIC18F4620.”
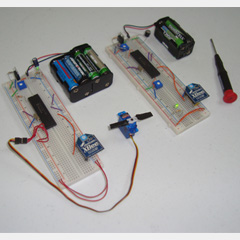
Xbee Wireless Servo Control
Posted December 22, 2011 by Chris
Today’s article shows you how to build a basic wireless input and output system in the form of a single transmitter and single receiver. Communication is one way to keep things simple with two xbee modules being used for the wireless link. In the end, a small trimpot will control the movement of a servo motor.

Programming a Picaxe 08m Chip
Posted December 11, 2011 by Chris
“The Picaxe 08m is a PIC chip with a pre-installed boot-loader that allows programming the chip via a serial port. This is similar to the way that the Arduino has an AVR chip with a pre-installed boot-loader. There’s also some software for the Picaxe for handling the programming, a bit like the Arduino IDE.”
DIY dsPIC breadboard
Posted December 9, 2011 by Chris
“This thing may remind you of an Arduino but it’s not, it’s not even an AVR but a dsPIC30F2012. Lots of times I want to try out something, but I’m too lazy to make the whole thing over and over on a breadboard so why not solder it together quick on a pref board so I can just stick it in.”
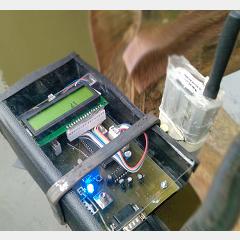
Wireless Water Level Monitoring System
Posted December 3, 2011 by Chris
“The main purpose is to gather water level data, store it in central database and view it on a web interface. This system can greatly reduce the effect of sudden water level increases due to rain, causing floods. Also, it minimizes the man power requirement to measure water levels in the reservoirs in distant areas.”
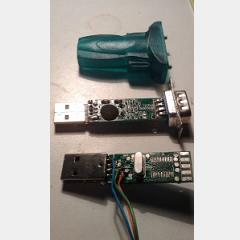
Learning Serial Communication
Posted October 29, 2011 by Chris
“This morning I decided its about time I learnt how to use the UART hardware in most PIC micro- controllers. I started off with a USB-RS-232 converter that I got for US$3 from DealExtreme.” A good look at how to hack a USB-to-Serial converter to mess around with a PIC’s UART module.
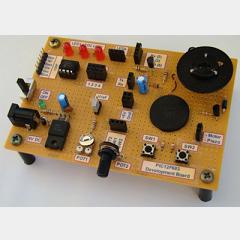
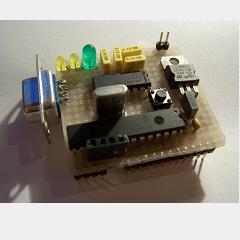
DIY PIC12F683 Development Board
Posted October 21, 2011 by Chris
“Our purpose here is to explore the potential of PIC12F683 micro for which we need a development board. The good thing is we are going to make our own board. The schematic and the actual board that I have built are shown below. I soldered all the components on a 12 x 8 cm general purpose prototyping board. ”
Currently Hot
PIC Priority Interrupts
learn how to give your interrupts priority
An Intro To Interrupts On A PIC
an easy guide for learning about interrupts
PIC As SPI Master And Slave
learn how to use spi on a pic
Animatronic Neck [DIY]
build a neck for an animatronic head
Homemade Animatronic Mouth
learn how to make your robot speak
Animatronics

Recent Articles
Arduino DDS Shield
build your own arduino based analog signal generator
A Digital Multimeter In Review (Tenma 72-7735)
learn about your typical digital multimeter in review
The PIC Annoy PCB
build something to annoy your co-workers
Automate Your Life With Cron
learn how to use cron for computer automation
Web Scraping For Weather Updates
learn how to use php to scrape the web
Creating A Web Server In Linux
learn how to make a lamp web server in linux
Stepper Motor Control With A stepRocker TMCM-1110
learn how a commercial stepper motor controller works
Arduino To PIC Wireless Proximity Motor Control
control a motor with a distance sensor wirelessly
PIC to Arduino Wireless Communication via XBee
use xbee to make a pic wirelessly talk to an arduino
Motor Control via Infrared Distance Sensor
control a motor simply by waving your hand

