


Get started learning to build your own electronics by following our FREE online courses below!
Learn More »
Categories
- animatronics (12)
- apple (11)
- arduino (179)
- art (41)
- articles (121)
- artificial intelligence (11)
- automation (421)
- avr (205)
- bitcoin (3)
- breadboard (9)
- cameras (57)
- cars (26)
- cell phones (28)
- clothing mods (21)
- console mods (26)
- dangerous (94)
- desktop mods (24)
- embedded (5)
- flying things (54)
- fpga (22)
- gaming creations (108)
- interface (225)
- internet (17)
- laptop mods (6)
- lasers (22)
- linux (7)
- magnetic (3)
- medical (12)
- microcontrollers (51)
- misc projects (152)
- msp (12)
- music (124)
- pic (90)
- projects (23)
- pyroedu (76)
- raspberry pi (26)
- robots (312)
- security (36)
- sensors (307)
- software (200)
- solar (19)
- stamp (9)
- tools (149)
- tutorials (98)
- Uncategorized (45)
- usb (44)
- wireless (256)
Sponsors
Build Like A Pyro!
Find many of the parts used on this site at our favorite online electronics shop

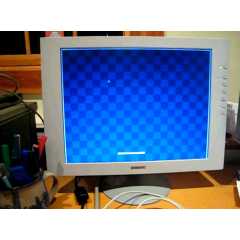
FPGA Pong On A Spartan 3a
Posted April 28, 2013 by Chris
“I put together this Pong demo as an exercise to help get more familiar with Verilog, and gain some experience working with the Xilinx tools and the Spartan 3A FPGA starter kit. It was very slow going at first, but things are slowly beginning to make sense to me now. And hey, I’ve got Pong!!”
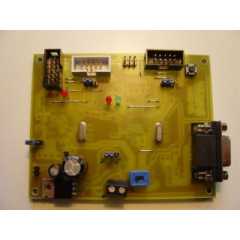
Evertool – DIY AVR Programmer/Debugger
Posted April 27, 2013 by Chris
“Evertool is an AVRISP/STK500-protocol and JTAGICE compatible Programmer/JTAG debugger. It has the following features: ISP Programmer compatible with Atmel AVRISP, directly accessable with AVRStudio and avrdude. JTAG debugger compatible with Atmel JTAGICE, directly accessable with AVRStudio and AVaRice. Simple hardware, standard parts.”

Electronic Thermometer Project by LM35 and LM3914
Posted April 26, 2013 by Chris
“As shown in the schematic, temperature sensor of our electronic thermometer is LM35DZ. There are some kinds of LM35 IC, since it is cheap and easy to find we used LM35DZ in our project. It measures from 0°C to 100°C with a very linear output graph. For one degree change, it increases its output 10mV.”

Digital Flip Flop Basics On PyroEDU
Posted April 25, 2013 by Chris
It is time for a new PyroEDU lesson in our Introduction To Digital Electronics course and it’s called Digital Flip Flops. Here is what this week’s lesson is all about:
To take another gigantic step into the world of digital electronics, we need to learn about flip-flops. In this lesson we take a look at two types of the flip-flops, the JK and D flip-flops. To learn what they are and how they work, we will put them in some experimental circuits and see how they react. Additionally, we will start to learn about digital clock signals.

Drive LCD TFT displays with an FPGA
Posted April 24, 2013 by Chris
“One of the great aspects of the logic is the speed and the full control of what happens at every single clock cycle….In this short post I will walk thru our current test setup with an FPGA, the Spartan 3E, controlling a 18-bit 7″ 800×480 TFT display.”

Quadcopter (From The Robot Fish)
Posted April 23, 2013 by Chris
“This amazing looking device is a quadcopter that was designed by me and my team at the University of Victoria….The purpose of the project was to create a DIY quadcopter for under $200 and push the limits of what the 3D printer in our laboratory can do.”

Honey, I Shrunk The Arduino
Posted April 22, 2013 by Chris
“The first decision you have to make is which Arduino compatible microcontroller you are going to base your circuit around. This will depend on the number of input/output pins you need as well as the size of the compiled sketch you intend to use. Given that I’m prototyping my ideas using an Arduino UNO, I decided to stick with the ATmega328P-PU chip the UNO is based around.”

Modifying a Robot Arm With Arduino
Posted April 21, 2013 by Chris
“In this post I’m going to first alter a robot arm I had built previously from a beginners kit so that it can be controlled from Arduino. Then I’m going to write a series of posts on different ways to control the robot arm using Processing and other things.”

Internetworking with Microchip Microcontrollers
Posted April 20, 2013 by Chris
“One of the first projects I published online a couple of years ago was about how to put together in a prototype board a simple circuit to interface a 10BaseT ethernet controller with a Microchip PIC18 microcontroller running the TCP/IP stack developed by Microchip. I called this project the PIC10T.”
Design An SR Latch (PyroEDU)
Posted April 18, 2013 by Chris
This week we’re rolling out a new less for our Introduction To Digital Electronics course and it’s called Design An SR Latch. Here is what this week’s lesson is all about:
The next step into the digital work is to create stable logic elements. The first such element is called a latch and it can be built using simple logic gates. In this lesson we will explore how to build a latch using NOR logic gates and NAND logic gates. In addition, we will take a look at what timing diagrams are and how to use them.
Currently Hot
The Stunning Camera
shock your friends when they take your picture
A Simple File Server
make a file server on your pc
A Simple VHDL Counter
create a simple counter using vhdl with a cpld
An Introduction To VHDL
a small tutorial on using vhdl with a cpld
The Autonomous Drifter
autonomous drifter controlled by your laptop
Animatronics

Recent Articles
Arduino DDS Shield
build your own arduino based analog signal generator
A Digital Multimeter In Review (Tenma 72-7735)
learn about your typical digital multimeter in review
The PIC Annoy PCB
build something to annoy your co-workers
Automate Your Life With Cron
learn how to use cron for computer automation
Web Scraping For Weather Updates
learn how to use php to scrape the web
Creating A Web Server In Linux
learn how to make a lamp web server in linux
Stepper Motor Control With A stepRocker TMCM-1110
learn how a commercial stepper motor controller works
Arduino To PIC Wireless Proximity Motor Control
control a motor with a distance sensor wirelessly
PIC to Arduino Wireless Communication via XBee
use xbee to make a pic wirelessly talk to an arduino
Motor Control via Infrared Distance Sensor
control a motor simply by waving your hand

