


Get started learning to build your own electronics by following our FREE online courses below!
Learn More »
Categories
- animatronics (12)
- apple (11)
- arduino (179)
- art (41)
- articles (121)
- artificial intelligence (11)
- automation (421)
- avr (205)
- bitcoin (3)
- breadboard (9)
- cameras (57)
- cars (26)
- cell phones (28)
- clothing mods (21)
- console mods (26)
- dangerous (94)
- desktop mods (24)
- embedded (5)
- flying things (54)
- fpga (22)
- gaming creations (108)
- interface (225)
- internet (17)
- laptop mods (6)
- lasers (22)
- linux (7)
- magnetic (3)
- medical (12)
- microcontrollers (51)
- misc projects (152)
- msp (12)
- music (124)
- pic (90)
- projects (23)
- pyroedu (76)
- raspberry pi (26)
- robots (312)
- security (36)
- sensors (307)
- software (200)
- solar (19)
- stamp (9)
- tools (149)
- tutorials (98)
- Uncategorized (45)
- usb (44)
- wireless (256)
Sponsors
Build Like A Pyro!
Find many of the parts used on this site at our favorite online electronics shop


Junk + Arduino = Robot #2
Posted May 18, 2013 by Chris
“This was the second robot I made for collective motion research purposes. As you can see, it is vastly simpler, cheaper and easier to build. Of course it doesn’t have nearly as many features or as much potential as robot 1, but I think it is much better for what I’m trying to do.
Here’s a picture of the prototype without the battery.”

Eternal Free-Swinging Pendulum
Posted May 17, 2013 by Chris
“This is the dedicated page about our first kit project – Eternal Free-swinging Pendulum, also known as Omni Pendulum. It’s a long and detailed story…”

Design A 4-Bit Counter
Posted May 16, 2013 by Chris
This week, we’re looking at binary counters! Specifically, we’re going to look at how to Design A 4-Bit Binary Counter. Here’s a quick intro of what this PyroEDU lesson is all about:
A great strength of digital circuitry is that the clock can act as a timer or counter with appropriate flip-flop circuitry in place. In this lesson, using some LEDs, we will learn how to build a 4-bit binary counter that uses the clock input to tell our circuit to increment a counter with every clock period.

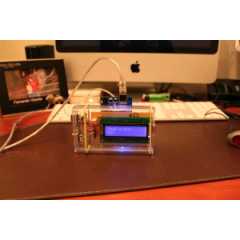
Electronic Distance Meter
Posted May 15, 2013 by Chris
“This project demonstrates the use of 16×1 line LCD module to interface with Nitron 16-pin MCU, 68HC908QY4. The original idea came from one evening I went out with my son to the park near my home in Korat. The park has a nice walking way for people to exercise. I was wondering how long the distance is?”

Spoke Ink – Persistance of Vision for your Bike
Posted May 14, 2013 by Chris
“Take your MSP430 for a spin with Spoke Ink! Spoke Ink is a booster pack that attaches to the spokes of your bicycle wheel. Using an array of 32 RGB LEDs and a magnetic sensor, this booster pack projects a bright, upright image right from the spokes of your wheel. Using our software, you can create this image from any bitmap.”
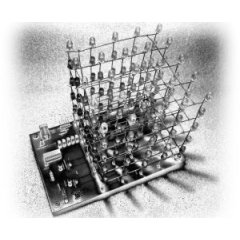
5^3 LED CUBE Controller
Posted May 13, 2013 by Chris
“The cube described on this page uses a 5 x 5 x 5 matrix of single colour LEDs. This is a good size to experiment with as the number of LEDs required at 125 keeps the cost down, doesn’t take too long to assemble and just fits onto a eurocard sized PCB. The power requirement is under 1 amp and the use of just one colour keeps both the hardware construction and control software fairly simple.”
Brute Force Attack A BIOS With Arduino
Posted May 12, 2013 by Chris
“The goal of this experiment is to convert the Arduino board into an USB keyboard plus a VGA sniffer to crack the password of a standard BIOS using the brute force attack method. There are no advantages in using this method, in fact this can be very slow and you may never find the password at all, but as always we do it for fun.”

Sensing Squeeze
Posted May 11, 2013 by Chris
“I’m researching squeeze sensing as a mode of tactile interface. Here I will cover the process of developing a squeezeable sensor and the firmware/software concerns associated with interpreting the data from the sensor.”
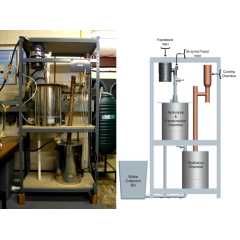
Small-scale Biofuel Production
Posted May 10, 2013 by Chris
“MEng students at Sussex do group projects of their choice. Our group chose to work on a Small-scale Biofuel Production unit, that converts organic household waste to bio-ethanol. The group was formed of four students – two electronic and two mechanical engineers.”
Design A 4-Bit Shift Register
Posted May 9, 2013 by Chris
This week, we’re looking at shift registers! Specifically, we’re going to look at how to Design A 4-Bit Shift Register. Here’s a quick intro of what this PyroEDU lesson is all about:
With all the basics covered, we can start to combine digital logic elements together and make useful devices. In this lesson we will take some flip-flops and other logic elements to build a 4-bit shift register. Some LEDs will be used to show you exactly how the shift register works.
Currently Hot
The Stunning Camera
shock your friends when they take your picture
A Simple File Server
make a file server on your pc
A Simple VHDL Counter
create a simple counter using vhdl with a cpld
An Introduction To VHDL
a small tutorial on using vhdl with a cpld
The Autonomous Drifter
autonomous drifter controlled by your laptop
Animatronics

Recent Articles
Arduino DDS Shield
build your own arduino based analog signal generator
A Digital Multimeter In Review (Tenma 72-7735)
learn about your typical digital multimeter in review
The PIC Annoy PCB
build something to annoy your co-workers
Automate Your Life With Cron
learn how to use cron for computer automation
Web Scraping For Weather Updates
learn how to use php to scrape the web
Creating A Web Server In Linux
learn how to make a lamp web server in linux
Stepper Motor Control With A stepRocker TMCM-1110
learn how a commercial stepper motor controller works
Arduino To PIC Wireless Proximity Motor Control
control a motor with a distance sensor wirelessly
PIC to Arduino Wireless Communication via XBee
use xbee to make a pic wirelessly talk to an arduino
Motor Control via Infrared Distance Sensor
control a motor simply by waving your hand

