


Get started learning to build your own electronics by following our FREE online courses below!
Learn More »
Categories
- animatronics (12)
- apple (11)
- arduino (179)
- art (41)
- articles (121)
- artificial intelligence (11)
- automation (421)
- avr (205)
- bitcoin (3)
- breadboard (9)
- cameras (57)
- cars (26)
- cell phones (28)
- clothing mods (21)
- console mods (26)
- dangerous (94)
- desktop mods (24)
- embedded (5)
- flying things (54)
- fpga (22)
- gaming creations (108)
- interface (225)
- internet (17)
- laptop mods (6)
- lasers (22)
- linux (7)
- magnetic (3)
- medical (12)
- microcontrollers (51)
- misc projects (152)
- msp (12)
- music (124)
- pic (90)
- projects (23)
- pyroedu (76)
- raspberry pi (26)
- robots (312)
- security (36)
- sensors (307)
- software (200)
- solar (19)
- stamp (9)
- tools (149)
- tutorials (98)
- Uncategorized (45)
- usb (44)
- wireless (256)
Sponsors
Build Like A Pyro!
Find many of the parts used on this site at our favorite online electronics shop


DIY Remote Control Based On PIC
Posted September 15, 2012 by Chris
“Control up to 8 devices by this easy constructable remote control. It can work as a radio or infrared remote control, depending on the components. Each device output can be configured to be momentary (turned on while you press the button) or latched. Latched outputs can be toggled on/off by one button per channel, or turned on and off by two buttons per channel.”

4-Input Mini Logic Analyzer
Posted September 14, 2012 by Chris
“This mini Logic analyzer is a tool for you to watch on LCD the logic transitions 0 or 1 of a digital data signal. A digital data signal can be found on the output pin of TSOP-1730 Infrared Receiver, on the Transmit and reveive pins of MAX-232 chip (RS-232), on Clock and Data pins of I2C data bus and many more electronic components. This circuit supports capturing for up to 100 kHz digital signals.”

Arduino Servo Motor Controller
Posted September 13, 2012 by Chris
“We have already explored how to control a servo motor using a PIC microcontroller, but this time let’s take a look at how to control a servo motor using the Arduino platform. We’re not trying to do anything extra-ordinary in this article, just trying to make the servo motor move to the specific angle that we want it to be at and stay there.”

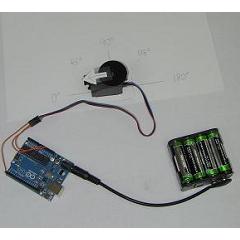
Measuring Projectile Velocity
Posted September 12, 2012 by Chris
“So being the EE that I am, this got me to thinking: wouldn’t this be even more fun if we could measure muzzle velocity? It shouldn’t be all that hard; we could just hook up a couple LEDs and photo-detectors, fire through the beams, time it with a microcontroller, and voila! So, that’s precisely what I did, except that I decided to go with a couple cheap laser diodes instead of LEDs.”
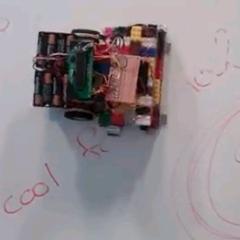
Magnetic Lego Whiteboard Eraser Robot
Posted September 11, 2012 by Chris
“Despite the fact that it is a really simple and cheap design, I really love this creation of a magnetic whiteboard eraser bot that’s built with Lego parts and a simple Atmel microcontroller, which acts as brain controller. Le Zhang and Michael Lathrop, both senior students at Cornell had this nice idea how to efficiently clean your professor’s whiteboard.”

Creating A Physical Version of the DIY Calculator
Posted September 10, 2012 by Chris
“Although the virtual DIY Calculator is lots of fun, there is something satisfying about having a real machine to play with, so we’ve been pondering the idea of creating a physical version of the DIY Calculator…”

Measuring Battery Capacity With An Arduino
Posted September 9, 2012 by Chris
“My idea was really simple: I would make a circuit that would fully discharge each of the batteries while measuring how much energy it produced…I had an Arduino and an LCD panel left over from a different project so I thought I’d make a standalone unit.”

Explorations In Conductive Ink
Posted September 8, 2012 by Chris
“I’ve recently had success in making a conductive ink using a fine copper powder suspended in an acrylic airbrush medium. This paper on conductive epoxies was really the key to getting this ink working….There is still quite a bit of experimentation to be done, but this is a very encouraging result!”

SPI Interface Big 7-Seg LED
Posted September 7, 2012 by Chris
“Easy build and use, the general purpose Big LED with SPI serial interfacing. Expandable for multiple digits but still uses only three wires for receiving data from any uC boards.”
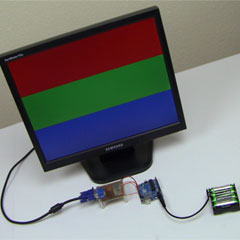
An Arduino Outputting VGA Signals
Posted September 6, 2012 by Chris
“In the past I have built many, many VGA based projects,, but never with Arduino and so, in this article, we will use the Arduino UNO platform to simulate VGA signals using straight C code. This doesn’t even come close to how video card designers do it, but it’s a fun exercise in seeing how well we understand the timing of the Arduino and AVR microcontroller as well as the VGA protocol.”
Currently Hot
Web Scraping For Weather Updates
learn how to use php to scrape the web
Creating A Web Server In Linux
learn how to make a lamp web server in linux
Stepper Motor Control With A stepRocker TMCM-1110
learn how a commercial stepper motor controller works
Arduino To PIC Wireless Proximity Motor Control
control a motor with a distance sensor wirelessly
PIC to Arduino Wireless Communication via XBee
use xbee to make a pic wirelessly talk to an arduino
Animatronics

Recent Articles
Arduino DDS Shield
build your own arduino based analog signal generator
A Digital Multimeter In Review (Tenma 72-7735)
learn about your typical digital multimeter in review
The PIC Annoy PCB
build something to annoy your co-workers
Automate Your Life With Cron
learn how to use cron for computer automation
Web Scraping For Weather Updates
learn how to use php to scrape the web
Creating A Web Server In Linux
learn how to make a lamp web server in linux
Stepper Motor Control With A stepRocker TMCM-1110
learn how a commercial stepper motor controller works
Arduino To PIC Wireless Proximity Motor Control
control a motor with a distance sensor wirelessly
PIC to Arduino Wireless Communication via XBee
use xbee to make a pic wirelessly talk to an arduino
Motor Control via Infrared Distance Sensor
control a motor simply by waving your hand

