


Get started learning to build your own electronics by following our FREE online courses below!
Learn More »
Categories
- animatronics (12)
- apple (11)
- arduino (179)
- art (41)
- articles (121)
- artificial intelligence (11)
- automation (421)
- avr (205)
- bitcoin (3)
- breadboard (9)
- cameras (57)
- cars (26)
- cell phones (28)
- clothing mods (21)
- console mods (26)
- dangerous (94)
- desktop mods (24)
- embedded (5)
- flying things (54)
- fpga (22)
- gaming creations (108)
- interface (225)
- internet (17)
- laptop mods (6)
- lasers (22)
- linux (7)
- magnetic (3)
- medical (12)
- microcontrollers (51)
- misc projects (152)
- msp (12)
- music (124)
- pic (90)
- projects (23)
- pyroedu (76)
- raspberry pi (26)
- robots (312)
- security (36)
- sensors (307)
- software (200)
- solar (19)
- stamp (9)
- tools (149)
- tutorials (98)
- Uncategorized (45)
- usb (44)
- wireless (256)
Sponsors
Build Like A Pyro!
Find many of the parts used on this site at our favorite online electronics shop


Writing Your Own Arduino Libraries
Posted March 15, 2013 by Chris
“Here at Nomi Design we have a fair amount of experience writing Arduino Libraries. So we thought we would share with the world our techniques for writing code into simple , clean, and easy to use Arduino Libraries.”
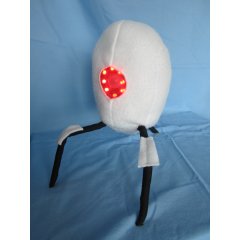
Portal Turret Plushie
Posted March 8, 2013 by Chris
“Deadly, yet adorable, this plush turret from the game Portal talks and responds when you play with it. It senses when you pick it up, knock it over, or walk in front of it. The stuffing and soft fleece skin make it super cuddly, too!”
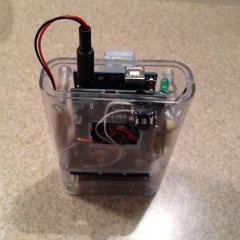
Simple Informatics Black Box
Posted March 6, 2013 by Chris
“Our project was, to put it simply, a personal informatics black box that you clip onto your belt. As you go about your day your activity, surrounding environment and locations are tracked to produce a report telling you how much time you spent inside and outside. The device leverages off of a system-of-systems providing context-aware analysis for such ubiquitous computing devices.”

Poor Man’s Arduino Line Follower
Posted March 4, 2013 by Chris
“Over the weekend, me and a friend of mine, cannibalized a 9 Lira RC car into line a follower. Code in this post covers everything up to [this] commit cf731aedc156f067aa221, refer to this particular commit for this project cause we plan on improving hence code will change. Stuff you will need: 3x QTR-1RC Reflectance Sensor, Ardumoto – Motor Driver Shield and A cheap RC car.”
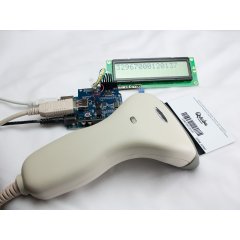
Connecting A Barcode Scanner To An Arduino
Posted February 25, 2013 by Chris
“A gadget that I demonstrate today is a portable autonomous barcode scanner built using an Arduino board, USB Host shield, handheld USB barcode scanner and LCD display. The operation is simple – when handheld scanner button is pressed, it scans the barcode and sends it to the Arduino symbol by symbol. The Arduino then outputs these symbols on LCD display.”
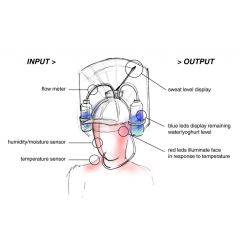
Nuclear Taco Sensor Helmet Gameshow
Posted February 10, 2013 by Chris
“The 48h project consisted of building a helmet device with humidity, temperature and fluid intake sensors, used to record and measure the reaction of nuclear taco victims of Codebits 2011 Nuclear Taco Challenge. The sensors and servos are connected by Arduino. 6 timelapse videos were recorded documenting the user experience. The host displayed using face substituion technology in realtime.”
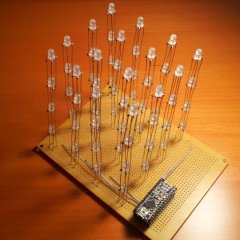
4x4x4 Tri-Color LED Cube
Posted February 5, 2013 by Chris
“Charliecube is a 4x4x4 tri-color LED Cube designed and created by Asher Glick and Kevin Baker. But what makes it special? Other cubes use shift registers, decade counters, or other components to control all the LEDs. The charliecube can be run using only 16 digital pins with no extra components.”

AllSparkCube: If you build it, they will come
Posted February 2, 2013 by Chris
“Every time I talk about the All Spark Cube people ask ‘so what does it do?’ The features of the All Spark are the reason it was built and sponsored by Adaptive Computing. The Cube was built to catch peoples’ attention and to demonstrate how Adaptive can take a chaotic mess and inject order, structure and efficiency. We wrote several examples of how the All Spark Cube can demonstrate the effectiveness of a complex data center.”

DIY Home Automation Using Twilio, PowerSwitch, Arduino, and Pusher
Posted January 19, 2013 by Chris
“You may have seen my recent blog post about building a Phone-controlled Robot using Twilio. Since then, I’ve had ideas for new Twilio + Arduino mashups pouring in from the community. Today is the second post in our new series of Twilio Hardware mashups – build your own home automation solution using Twilio SMS, PowerSwitch, Arduino, and PusherApp.”

Knock Box (repeats rhythm used when knocking on the lid)
Posted January 14, 2013 by Chris
“Doing some initial research on automatic door knockers, I came across an excellent post describing a secret knock-detecting door. This looked like a perfect starting point, so I decided to recreate it with my own hardware. To simplify input and output, I started with a simple button for input and an LED for output. I took the code provided and modified it so that it replayed rather than validating the recorded knock pattern.”
Currently Hot
Programming the eBOX
create & download an os image to the eBOX-II
The Altera DE2 Board
a simple introduction for setting up the DE2 board
The eBOX-II Embedded PC
learn the in's and out's of the eBOX-II
Stepper Motor Control
control a stepper motor using an LMD18245
PIC Prototyping Basics
build your own pic prototype development board
Animatronics

Recent Articles
Arduino DDS Shield
build your own arduino based analog signal generator
A Digital Multimeter In Review (Tenma 72-7735)
learn about your typical digital multimeter in review
The PIC Annoy PCB
build something to annoy your co-workers
Automate Your Life With Cron
learn how to use cron for computer automation
Web Scraping For Weather Updates
learn how to use php to scrape the web
Creating A Web Server In Linux
learn how to make a lamp web server in linux
Stepper Motor Control With A stepRocker TMCM-1110
learn how a commercial stepper motor controller works
Arduino To PIC Wireless Proximity Motor Control
control a motor with a distance sensor wirelessly
PIC to Arduino Wireless Communication via XBee
use xbee to make a pic wirelessly talk to an arduino
Motor Control via Infrared Distance Sensor
control a motor simply by waving your hand

