


Get started learning to build your own electronics by following our FREE online courses below!
Learn More »
Categories
- animatronics (12)
- apple (11)
- arduino (179)
- art (41)
- articles (121)
- artificial intelligence (11)
- automation (421)
- avr (205)
- bitcoin (3)
- breadboard (9)
- cameras (57)
- cars (26)
- cell phones (28)
- clothing mods (21)
- console mods (26)
- dangerous (94)
- desktop mods (24)
- embedded (5)
- flying things (54)
- fpga (22)
- gaming creations (108)
- interface (225)
- internet (17)
- laptop mods (6)
- lasers (22)
- linux (7)
- magnetic (3)
- medical (12)
- microcontrollers (51)
- misc projects (152)
- msp (12)
- music (124)
- pic (90)
- projects (23)
- pyroedu (76)
- raspberry pi (26)
- robots (312)
- security (36)
- sensors (307)
- software (200)
- solar (19)
- stamp (9)
- tools (149)
- tutorials (98)
- Uncategorized (45)
- usb (44)
- wireless (256)
Sponsors
Build Like A Pyro!
Find many of the parts used on this site at our favorite online electronics shop


Introduction To Analog Electronics
Posted August 14, 2013 by Chris
Starting next week, PyroEDU is introducing a new course: An Introduction To Analog Electronics. Here’s a quick summary of the course and some links with more details.
This course is meant to create a pathway into learning about analog electronics, for people who are scared of the math and general trickery that usually comes with it. A hands-on approach is taken in this course through a combination of lecture and experimentation to teach you about the different basic ideas (AC vs. DC, filters and amplifiers) used in analog electronics.
Ludde’s FPGA NES
Posted August 13, 2013 by Chris
“I was a bit bored during Christmas, so I decided to construct a whole Nintendo Entertainment System (NES) in an FPGA. An FPGA is a programmable integrated circuit, generally programmed using a hardware description language. The FPGA contains thousands of logic blocks, that can be connected together to form complex combinatorial logic, and flipflops are used to implement memory and feedback loops.”

DIY I2C Motor Controller
Posted August 12, 2013 by Chris
“The idea of building my own I2C smart DC motor controller is came to me when I was learning and playing together with my son on his LEGO MINDSTORM NXT 2.0 about a year ago. The NXT sophisticated controller also called NXT Intelligent Brick is powered by Atmel 32-bit ARM7 AT91SAM7S256 microcontroller and communicating with Atmel 8-bit AVR ATmega48 acting as a co-microcontroller using I2C protocol.”

Conversion of Cheap Optical Mouse to Robot Odometer
Posted August 11, 2013 by Chris
“For a small robot project I needed a way to measure a robot’s progress across the floor. There are various possibilities, such as: use stepper motors, add an encoder to the wheels or use the optical sensor for a mouse.”

Double Down: An automated card-dealer
Posted August 10, 2013 by Chris
“The Double Down card dealer is a fully programmable automated card dealer. It has the ability to deal a card in two directions (left or right, dealer or player, etc) while at the same time moving linearly perpendicular to those directions (card stack 1, 2, 3, etc).”

ISP for AVR Microcontrollers
Posted August 9, 2013 by Chris
“The FabISP is an in-system programmer for AVR microcontrollers, designed for production within a FabLab. That is, it allows you to program the microcontrollers on other boards you make, using nothing but a USB cable and 6-pin IDC to 6-pin IDC cable. It’s based on the USBtiny and V-USB firmwares, which allow the ATtiny44 to perform USB communication in software.”

Wireless Temperature Sensor using RF Transmitter/Receiver
Posted August 8, 2013 by Chris
“A while back, I did a wireless temperature sensor project using XBee radios….So I decided to try the same project using inexpensive RF devices. I used a 434MHz transmitter ($4) and receiver ($5) from Sparkfun, and had great success with these cheap devices. I also used a simple LM34 Fahrenheit temperature sensor, two Arduinos, and a two-digit LED display to show the temperature at the receiver end.”

BeagleBone GamingCape
Posted August 7, 2013 by Chris
“The BeagleBone GamingCape transforms your BeagleBone into a full fledged hand-held gaming console capable of playing all the classics such as NES, Gameboy, Sega GameGear, and even Doom. Just drop in 4 AAA batteries and you’ll be playing your favourite games in no time. ”
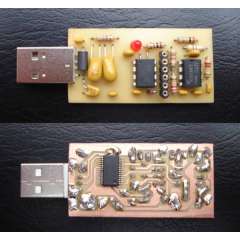
True Random Numbers @ USB
Posted August 6, 2013 by Chris
“This ain’t yet another ultimate, ultrafast and all-too-miniaturized USB-gadget. It is the ‘official’ USB-version of the XR232-TRNG, taking advantage from the benefits of USB, but retaining fundamental XR232-philosophy of independency, security, transparency and compatibility.”
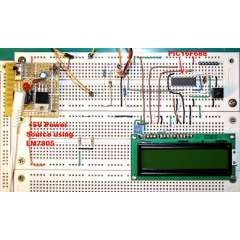
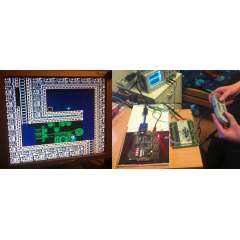
PIC-based Digital Voltmeter (DVM)
Posted August 4, 2013 by Chris
“This project will describe how to make a simple digital voltmeter (DVM) using a PIC16F688 microcontroller. The range of this DVM is 0-20V, but you can easily increase or decrease the range of input voltage as your requirements after you understand the voltage scaling method described in this project.”
Currently Hot
DIY Stepper Motor Controller
reliable stepper motor control in a diy pcb
The Sharpie Dotifier
a robotic arm that draws everything
Line Following Mini Tank
a wooden tank that follows black lines
Homemade PCB (Etching)
build a pcb board with your bare hands
Simple Motor Optical Encoder
build a simple-low cost optical encoder
Animatronics

Recent Articles
Arduino DDS Shield
build your own arduino based analog signal generator
A Digital Multimeter In Review (Tenma 72-7735)
learn about your typical digital multimeter in review
The PIC Annoy PCB
build something to annoy your co-workers
Automate Your Life With Cron
learn how to use cron for computer automation
Web Scraping For Weather Updates
learn how to use php to scrape the web
Creating A Web Server In Linux
learn how to make a lamp web server in linux
Stepper Motor Control With A stepRocker TMCM-1110
learn how a commercial stepper motor controller works
Arduino To PIC Wireless Proximity Motor Control
control a motor with a distance sensor wirelessly
PIC to Arduino Wireless Communication via XBee
use xbee to make a pic wirelessly talk to an arduino
Motor Control via Infrared Distance Sensor
control a motor simply by waving your hand

