


Get started learning to build your own electronics by following our FREE online courses below!
Learn More »
Categories
- animatronics (12)
- apple (11)
- arduino (179)
- art (41)
- articles (121)
- artificial intelligence (11)
- automation (421)
- avr (205)
- bitcoin (3)
- breadboard (9)
- cameras (57)
- cars (26)
- cell phones (28)
- clothing mods (21)
- console mods (26)
- dangerous (94)
- desktop mods (24)
- embedded (5)
- flying things (54)
- fpga (22)
- gaming creations (108)
- interface (225)
- internet (17)
- laptop mods (6)
- lasers (22)
- linux (7)
- magnetic (3)
- medical (12)
- microcontrollers (51)
- misc projects (152)
- msp (12)
- music (124)
- pic (90)
- projects (23)
- pyroedu (76)
- raspberry pi (26)
- robots (312)
- security (36)
- sensors (307)
- software (200)
- solar (19)
- stamp (9)
- tools (149)
- tutorials (98)
- Uncategorized (45)
- usb (44)
- wireless (256)
Sponsors
Build Like A Pyro!
Find many of the parts used on this site at our favorite online electronics shop


Audio Amplifier – An Introduction To Analog Electronics
Posted October 31, 2013 by Chris
And now for the final lesson in our PyroEDU Analog Electronics course! In this Lesson, we will take a look at how to make an Audio Amplifier. Here’s a quick intro of what this PyroEDU lesson is all about:
Designing a general purpose audio amplifier is a time tested favorite project of many electronics students. It shows that you are comfortable with building circuits and that you can actually make something useful! In this lesson, we will go through the process of designing a simple audio amplifier to make a very quiet audio signal really, really loud.
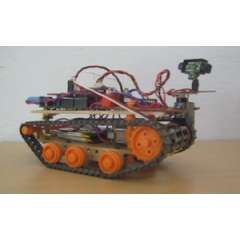
XBee Wireless Robot + Obstacle Avoidance
Posted October 30, 2013 by Chris
"The goal of my project was to design and implement a mobile robot that can be controlled wirelessly using speech as a user interface. This was my first mobile robot which I built by forking concepts from here and there. I tried to follow open standards and use opensource hardware and software components wherever possible."
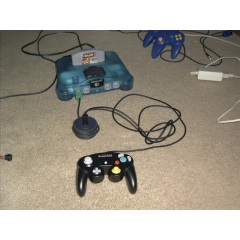
Cube64 GameCube to N64 Adaptor
Posted October 29, 2013 by Chris
"Enjoy retro N64 games, but can’t stand the controller? That’s the situation I found myself in about 7 years ago, back in 2004. So I built an adaptor, to use Game Cube controllers on the N64."
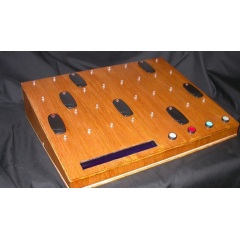
A Physical RFID Music Sequencer
Posted October 27, 2013 by Chris
"I have always like the idea of a physical music sequencer but I didn’t want to make one like the other I had seen so I decided to come up with, what I believe, is a unique take on the concept an RFID sequencer."
Overclocking Arduino With Liquid Nitrogen Cooling
Posted October 26, 2013 by Chris
"Why? Because I can. To learn how electronics behave at cryogenic temperatures. And just curious how much juice you can squeeze out of AVR if you push hard enough This also produced some results relevant to desktop processors overclocking with liquid nitrogen cooling."

Streaming Video And Audio From A Raspberry Pi With No Latency
Posted October 25, 2013 by Chris
"A lot of people asked if we could enable wireless streaming for it. I was personally very excited about that since I have been playing with the thought for quite a while, so when the official camera module for the Raspberry Pi became available I bought it straight away."
OpAmp Amplifier – An Introduction To Analog Electronics
Posted October 24, 2013 by Chris
Can you believe it! We are on our second to last lesson in our PyroEDU Analog Electronics course…only 1 left after this! In this Lesson, we will expand on the Intro To OpAmps from the basics course and actually build an OpAmp Amplifier. Here’s a quick intro of what this PyroEDU lesson is all about:
A different type of standard amplifier uses what is called an op-amp. This type of amplifier is very easy to setup and design with widely available formulas for how they work. In this lesson we will put these equations to work and build a basic 741 opamp amplifier, testing it out with an audio input signal.

Oscione – An Open Source Android Oscilloscope
Posted October 23, 2013 by Chris
"The project consists of both a custom hardware front-end for data acquisition and an Android application for visualizing the collected data samples to the user. Data is transferred over USB to the Beagleboard running Android, and then plotted on an external screen."

Ultrasonic Haptic Vision System
Posted October 22, 2013 by Chris
"The ultrasonic haptic vision system enables a person to navigate hallways and around large objects without sight, through the use of an ultrasonic rangefinder that haptically interfaces with the user via tiny vibrating motors mounted on the user’s head."
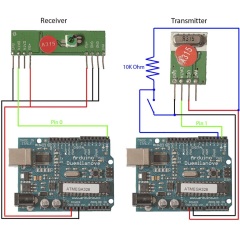
Cheap Arduino Wireless Communications
Posted October 21, 2013 by Chris
"I was looking for a way to handle wireless communications between two Arduino boards. Other options like Xbee or Bluetooth were going to cost $50 to over $100. Then I found a cheap RF transmitter and receiver at Sparkfun. The total cost is only $9!"
Currently Hot
DIY Stepper Motor Controller
reliable stepper motor control in a diy pcb
The Sharpie Dotifier
a robotic arm that draws everything
Line Following Mini Tank
a wooden tank that follows black lines
Homemade PCB (Etching)
build a pcb board with your bare hands
Simple Motor Optical Encoder
build a simple-low cost optical encoder
Animatronics

Recent Articles
Arduino DDS Shield
build your own arduino based analog signal generator
A Digital Multimeter In Review (Tenma 72-7735)
learn about your typical digital multimeter in review
The PIC Annoy PCB
build something to annoy your co-workers
Automate Your Life With Cron
learn how to use cron for computer automation
Web Scraping For Weather Updates
learn how to use php to scrape the web
Creating A Web Server In Linux
learn how to make a lamp web server in linux
Stepper Motor Control With A stepRocker TMCM-1110
learn how a commercial stepper motor controller works
Arduino To PIC Wireless Proximity Motor Control
control a motor with a distance sensor wirelessly
PIC to Arduino Wireless Communication via XBee
use xbee to make a pic wirelessly talk to an arduino
Motor Control via Infrared Distance Sensor
control a motor simply by waving your hand

