


Get started learning to build your own electronics by following our FREE online courses below!
Learn More »
Categories
- animatronics (12)
- apple (11)
- arduino (179)
- art (41)
- articles (121)
- artificial intelligence (11)
- automation (421)
- avr (205)
- bitcoin (3)
- breadboard (9)
- cameras (57)
- cars (26)
- cell phones (28)
- clothing mods (21)
- console mods (26)
- dangerous (94)
- desktop mods (24)
- embedded (5)
- flying things (54)
- fpga (22)
- gaming creations (108)
- interface (225)
- internet (17)
- laptop mods (6)
- lasers (22)
- linux (7)
- magnetic (3)
- medical (12)
- microcontrollers (51)
- misc projects (152)
- msp (12)
- music (124)
- pic (90)
- projects (23)
- pyroedu (76)
- raspberry pi (26)
- robots (312)
- security (36)
- sensors (307)
- software (200)
- solar (19)
- stamp (9)
- tools (149)
- tutorials (98)
- Uncategorized (45)
- usb (44)
- wireless (256)
Sponsors
Build Like A Pyro!
Find many of the parts used on this site at our favorite online electronics shop

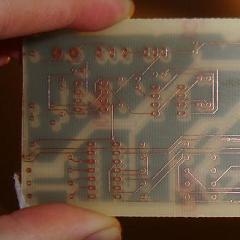
DIY 2 Layer PCB’s
Posted March 10, 2011 by Chris
This PyroElectro tutorial shows you have to step beyond making simple 1 layer PCBs and how to make your own 2 layer PCBs at home, completely DIY. The example design is a simple LED flashing circuit, but it requires 2 layers. Take a look and see how it’s made.
17 Responses to “DIY 2 Layer PCB’s”
Leave a Reply
Currently Hot
FPGA/CPLD ADC Interface
build a digital interface to understand analog
Arduino LED Flashing Introduction
begin your journey learning about the arduino here
Wireless XBee Motor Control
wireless dual dc motor control via xbee
DIY Mini PIC Development Board
build your own quick, easy and awesome pic dev board
Wireless XBee Pan/Tilt With Servos
build a wireless pan/tilt system for your camera
Animatronics

Recent Articles
Arduino DDS Shield
build your own arduino based analog signal generator
A Digital Multimeter In Review (Tenma 72-7735)
learn about your typical digital multimeter in review
The PIC Annoy PCB
build something to annoy your co-workers
Automate Your Life With Cron
learn how to use cron for computer automation
Web Scraping For Weather Updates
learn how to use php to scrape the web
Creating A Web Server In Linux
learn how to make a lamp web server in linux
Stepper Motor Control With A stepRocker TMCM-1110
learn how a commercial stepper motor controller works
Arduino To PIC Wireless Proximity Motor Control
control a motor with a distance sensor wirelessly
PIC to Arduino Wireless Communication via XBee
use xbee to make a pic wirelessly talk to an arduino
Motor Control via Infrared Distance Sensor
control a motor simply by waving your hand


March 10th, 2011 at 7:23 pm
So many great articles… where do you find all this stuff? Anyway, I would LOVE to step up my game to 2-layer boards. Sometimes it is an absolute nightmare trying to route single layer all the time. 🙂
March 10th, 2011 at 7:34 pm
Thanks and yeah, luckily it’s pretty easy to find 2 layer boards in stores still. Give it a shot or two. Just start off with smaller boards.
March 15th, 2011 at 10:04 am
Would drilling out two of the vias on opposite corners (like fiducials) and using them to line up the designs work for alignment? I would imagine if you held the paper up to the light, you could see though and line it up. I would try this, but I am not yet up to etching my own boards.
March 15th, 2011 at 4:47 pm
Hey Tim,
Yea, drilling out Vias or any holes you have in your board helps immensely in lining things up for the 2nd layer toner transfer. I actually did this for the next project I’ll post this week (3/17).
You can then cut out the drill holes in your toner transfer paper and line things up virtually perfectly.