


Get started learning to build your own electronics by following our FREE online courses below!
Learn More »
Categories
- animatronics (12)
- apple (11)
- arduino (179)
- art (41)
- articles (121)
- artificial intelligence (11)
- automation (421)
- avr (205)
- bitcoin (3)
- breadboard (9)
- cameras (57)
- cars (26)
- cell phones (28)
- clothing mods (21)
- console mods (26)
- dangerous (94)
- desktop mods (24)
- embedded (5)
- flying things (54)
- fpga (22)
- gaming creations (108)
- interface (225)
- internet (17)
- laptop mods (6)
- lasers (22)
- linux (7)
- magnetic (3)
- medical (12)
- microcontrollers (51)
- misc projects (152)
- msp (12)
- music (124)
- pic (90)
- projects (23)
- pyroedu (76)
- raspberry pi (26)
- robots (312)
- security (36)
- sensors (307)
- software (200)
- solar (19)
- stamp (9)
- tools (149)
- tutorials (98)
- Uncategorized (45)
- usb (44)
- wireless (256)
Sponsors
Build Like A Pyro!
Find many of the parts used on this site at our favorite online electronics shop

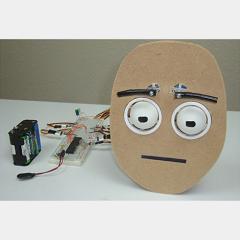
[DIY] Animatronic Eyes
Posted August 11, 2011 by Chris
Ready for the next Animatronics Tutorial for robotics month? This week, we’re building Animatronic Eyes using an improvised 2-axis gimbal system. Realistic robotic eyes are difficult to build but this pair of eyes creates quite a decent illusion. Pico/Micro Hobby Servos are used as actuators and standard MDF board for building material.
15 Responses to “[DIY] Animatronic Eyes”
Leave a Reply
Currently Hot
Web Scraping For Weather Updates
learn how to use php to scrape the web
Creating A Web Server In Linux
learn how to make a lamp web server in linux
Stepper Motor Control With A stepRocker TMCM-1110
learn how a commercial stepper motor controller works
Arduino To PIC Wireless Proximity Motor Control
control a motor with a distance sensor wirelessly
PIC to Arduino Wireless Communication via XBee
use xbee to make a pic wirelessly talk to an arduino
Animatronics

Recent Articles
Arduino DDS Shield
build your own arduino based analog signal generator
A Digital Multimeter In Review (Tenma 72-7735)
learn about your typical digital multimeter in review
The PIC Annoy PCB
build something to annoy your co-workers
Automate Your Life With Cron
learn how to use cron for computer automation
Web Scraping For Weather Updates
learn how to use php to scrape the web
Creating A Web Server In Linux
learn how to make a lamp web server in linux
Stepper Motor Control With A stepRocker TMCM-1110
learn how a commercial stepper motor controller works
Arduino To PIC Wireless Proximity Motor Control
control a motor with a distance sensor wirelessly
PIC to Arduino Wireless Communication via XBee
use xbee to make a pic wirelessly talk to an arduino
Motor Control via Infrared Distance Sensor
control a motor simply by waving your hand


August 12th, 2011 at 3:19 am
[…] productive to do? Well, why not check out what Chris at PyroElectro has in store for you via his tutorial on building your own pair of animatronic eyes that are certain to enthrall whoever that lay their […]
August 12th, 2011 at 5:36 am
[…] productive to do? Well, why not check out what Chris at PyroElectro has in store for you via his tutorial on building your own pair of animatronic eyes that are certain to enthrall whoever that lay their […]
August 12th, 2011 at 6:10 am
[…] productive to do? Well, why not check out what Chris at PyroElectro has in store for you via his tutorial on building your own pair of animatronic eyes that are certain to enthrall whoever that lay their […]
June 12th, 2014 at 12:48 pm
Thank you for this great electronic experience but,
as far as I can program my PIC 18F452, none of my servo motors
are moving … I can test voltage on each of them but they do not move. The pic receives voltage on its ports, the led is up, the regulator is working fine.
What can I do to make the whole thing work ???
Thanks a lot for your response.
A.MAISON
February 1st, 2021 at 1:34 am
DistributorPintu.com stands out as the top manufacturer for eatery not to mention retail doors. All of us have marketplace leading doors just for deterioration challenging, terminate valuable, as well as supermarket… click https://pembuatanpintuflush.blogspot.com/2020/08/jual-pintu-flush-1-jakarta-utara-0812.html for detail.