8x8x8 LED Cube Vertical Layer Construction
Now it's time to actually build the cube and unfortunately that doesn't mean things get any easier. The vertical construction portion of the project is one of the most crucial. You need to make sure the layers are equidistant (we're shooting for 16mm layer-to-layer, since that was the horizontal distance we chose earlier). So get your 8 horizontal layers nearby and let's go!
Building The Complex Circuit
To do this portion, you'll need your soldering iron again along with a few other parts. I used some 1/2" diameter wooden dowels, my ruler again, the template and the LED layers.
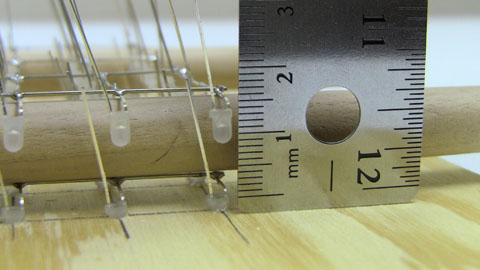
·Here you can see the wooden dowels are about 12.5mm diamter (around 1/2" inch).
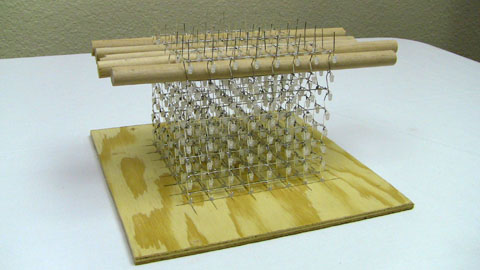
·I used the wooden dowels as spacers and to act as a place for the next layer of LEDs to rest before they got soldered into place.
·Here you can see the next layer resting on the wooden dowels before I soldered the two LED layers together.
·Now the very important part, spacing! The wooden dowels make it so that the space from the bottom layer LEDs to the next layer up is exactly 16mm! My rules shows 12mm because the measurement doesn't start exactly at the end of the ruler. So these wooden dowels are perfect for making sure my LED cube has correct spacing vertically and for a resting place for layers as they're soldered on vertically.
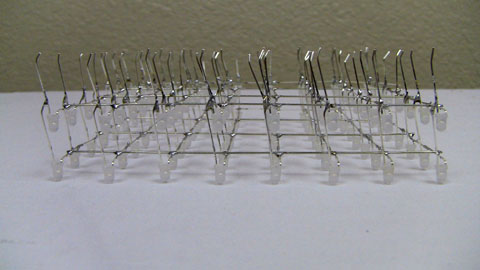
·Here you can see the first two layers soldered together. A nice method to use is to go through and bend 3mm of the edge of the anode pins on each LED. Then you can use your tweezers and solder iron to get a good connection to the next layer up.
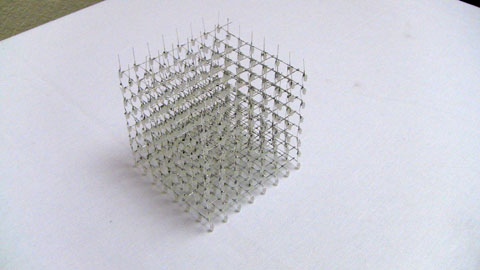
·Repeat this process for all layers until you get to the very end. We ended up using a few more wooden dowels to space things out properly, the center of each layer started to droop and it made LED spacing rectangular and not 16mm x 16mm square like we want.
·After some time with the soldering iron it's finished, and we have the LED cube!
·Before we continue I wanted to make a very important note about testing. So let's continue to the next page for that.
Now it's time to actually build the cube and unfortunately that doesn't mean things get any easier. The vertical construction portion of the project is one of the most crucial. You need to make sure the layers are equidistant (we're shooting for 16mm layer-to-layer, since that was the horizontal distance we chose earlier). So get your 8 horizontal layers nearby and let's go!
Building The Complex Circuit
To do this portion, you'll need your soldering iron again along with a few other parts. I used some 1/2" diameter wooden dowels, my ruler again, the template and the LED layers.
·Here you can see the wooden dowels are about 12.5mm diamter (around 1/2" inch).
·I used the wooden dowels as spacers and to act as a place for the next layer of LEDs to rest before they got soldered into place.
·Here you can see the next layer resting on the wooden dowels before I soldered the two LED layers together.
·Now the very important part, spacing! The wooden dowels make it so that the space from the bottom layer LEDs to the next layer up is exactly 16mm! My rules shows 12mm because the measurement doesn't start exactly at the end of the ruler. So these wooden dowels are perfect for making sure my LED cube has correct spacing vertically and for a resting place for layers as they're soldered on vertically.
·Here you can see the first two layers soldered together. A nice method to use is to go through and bend 3mm of the edge of the anode pins on each LED. Then you can use your tweezers and solder iron to get a good connection to the next layer up.
·Repeat this process for all layers until you get to the very end. We ended up using a few more wooden dowels to space things out properly, the center of each layer started to droop and it made LED spacing rectangular and not 16mm x 16mm square like we want.
·After some time with the soldering iron it's finished, and we have the LED cube!
·Before we continue I wanted to make a very important note about testing. So let's continue to the next page for that.