Schematic Overview
This is a generic schematic for 4-bit mode operation. You'll notice that we only connect wires to the upper 4 bits of the data pins on the lcd. This just makes it easier on us, less wiring and a few more lines of programming code.
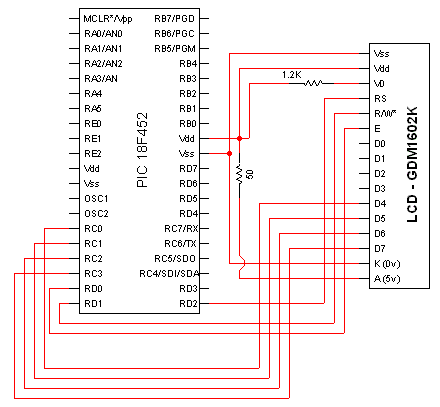
Schematic Specifics
Pins 15 & 16 - Backlight
The datasheet makes this thing tricky to figure out. All it is, is an led backlight and so we put a 50-300 ohm resistor in front and give it some power & gnd and it will light up.
Pin 3 - Contrast - Vo
On the schematic I just put a 1.2k resistor. This is potentially a bad design because the contrast circuitry could change. Ideally you should put a 5k or 10k trimpot here so you can vary the contrast easily. I measured out the trimpot resistance for optimal contras and found that to be 1.2k. That is why it's in my design like that.
Pins 4, 5 & 6 - Control Lines
These are the various control lines that tell the control logic on the lcd what we want it to do. The enable pin is really the only line that we'll get much use out of.
Pins 11, 12, 13 & 14 - Data Lines
This is where our 4-bit data bus will be connected. This tutorial uses portc for the data bus.
This is a generic schematic for 4-bit mode operation. You'll notice that we only connect wires to the upper 4 bits of the data pins on the lcd. This just makes it easier on us, less wiring and a few more lines of programming code.
Schematic Specifics
Pins 15 & 16 - Backlight
The datasheet makes this thing tricky to figure out. All it is, is an led backlight and so we put a 50-300 ohm resistor in front and give it some power & gnd and it will light up.
Pin 3 - Contrast - Vo
On the schematic I just put a 1.2k resistor. This is potentially a bad design because the contrast circuitry could change. Ideally you should put a 5k or 10k trimpot here so you can vary the contrast easily. I measured out the trimpot resistance for optimal contras and found that to be 1.2k. That is why it's in my design like that.
Pins 4, 5 & 6 - Control Lines
These are the various control lines that tell the control logic on the lcd what we want it to do. The enable pin is really the only line that we'll get much use out of.
Pins 11, 12, 13 & 14 - Data Lines
This is where our 4-bit data bus will be connected. This tutorial uses portc for the data bus.