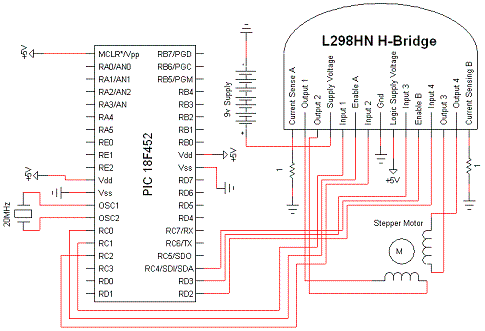
Schematic Overview
The schematic for this tutorial is not that bad. It will take a few minutes to wire it up on a small breadboard. The main components on it are the PIC, Stepper Motor & the L298 (L298HN).
View Full Schematic
Schematic Specifics
PIC Microcontroller
The brains of this tutorial is the PIC microcontroller. It will tell the motor driver what to do and exactly when to do it. You may have also noticed that several more pins are used off of the PIC than normal. Ports C & D are used for enabling and sending the PWM output signals.
L298 Stepper Motor Driver
If the PIC is the brains of this project then the L298 is the heart. This device acts as our H-Bridge to control current flow (speed) and direction based off of PWM inputs to Input pins 1-4. The Output Pins 1-4 are directly connected to the stepper motor.
Stepper Motor
This is the 2-coil motor that will be driven by the motor controller. It is a low current stepper motor that operates at 9.2v. The motor driver has been setup to allow maximum current flow via the current sensing resistors on pins 1 & 15.
The schematic for this tutorial is not that bad. It will take a few minutes to wire it up on a small breadboard. The main components on it are the PIC, Stepper Motor & the L298 (L298HN).
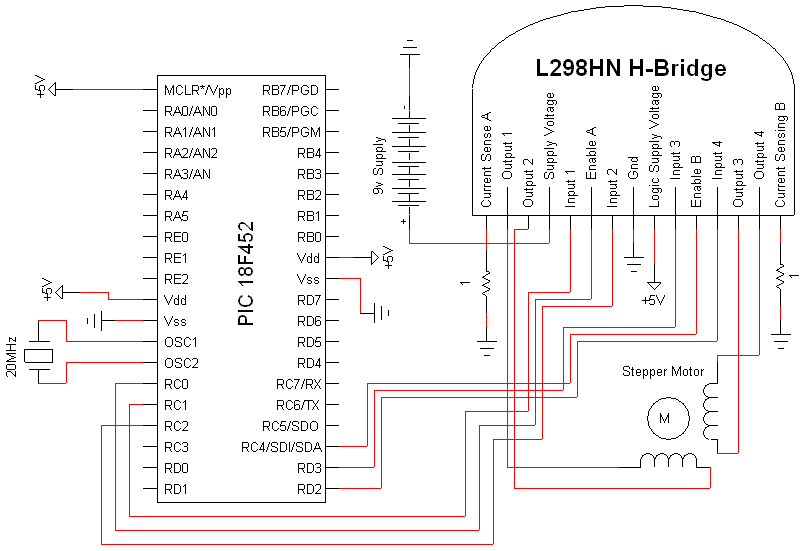
View Full Schematic
Schematic Specifics
PIC Microcontroller
The brains of this tutorial is the PIC microcontroller. It will tell the motor driver what to do and exactly when to do it. You may have also noticed that several more pins are used off of the PIC than normal. Ports C & D are used for enabling and sending the PWM output signals.
L298 Stepper Motor Driver
If the PIC is the brains of this project then the L298 is the heart. This device acts as our H-Bridge to control current flow (speed) and direction based off of PWM inputs to Input pins 1-4. The Output Pins 1-4 are directly connected to the stepper motor.
Stepper Motor
This is the 2-coil motor that will be driven by the motor controller. It is a low current stepper motor that operates at 9.2v. The motor driver has been setup to allow maximum current flow via the current sensing resistors on pins 1 & 15.