The Theory
Understanding how to use the custom character generator ram inside the HD44780 LCD module will take a little bit of effort on your part, so just read through the theory as described below, refer to the datasheet and you'll get a good idea of what is happening and how to implement it.
Encoding A 5x8 Custom Character
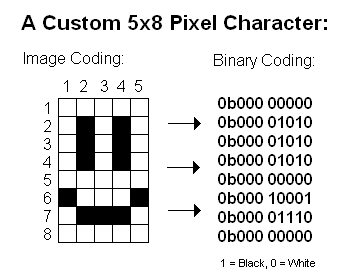
There are two sizes of fonts that this LCD module can display, 5x8 and 5x10. For this tutorial we will use an example 5x8 custom character. Above you can see a smiley face I have drawn inside of a 5x8 pixel grid. Next to the pixel image I have the binary encoding of the image. "0b" denotes a binary number in C/C++ and I will use that notation throughout the tutorial. The 1's represent a black pixel and the 0's represent a white pixel. Since The data bus is 8-bits wide, the upper 3 bits are not used, and should always be set to zero. The 5 lower bits are where the data for a specific line of the image is stored.
Accessing The Character Generator RAM
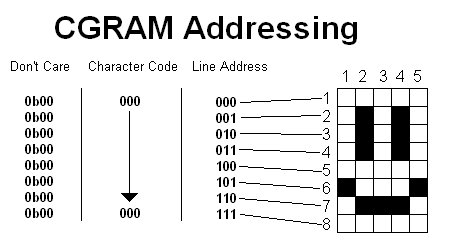
Now that we know what we want the character to look like and how to encode it in binary, we need to learn how to store the encoded image on the LCD. The LCD module has 8 memory locations (0b000 to 0b111) where characters can be stored. The smiley face image we're making will be character code 0b000 (seen above in the above 'character code' column). Each character code, has 8 addresses for the 8 lines of data of the image. So, we need to fill our specific character code (0b000) with the 8 lines of encoded image data.
Load Image Data To The CGRAM
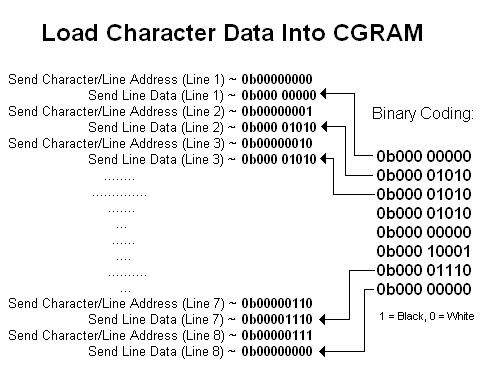
To load the data of our image into the character code 0b000, we have to send the command telling the character generator ram which character and which line, and then send the actual data. This two-step process occurs 8 times, once for each line of data that needs to be put into the CGRAM (character generator RAM). There is a lot of binary work happening here, so take your time and don't get your 0's and 1's mixed up.
Display The Character On The LCD
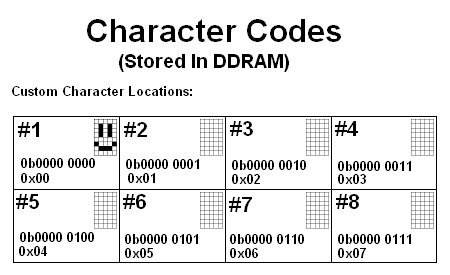
After the image data is loaded into the CGRAM, the data will stay there unless the LCD module is power cycled. So our custom image now resides at character location 0b0000 0000. If you want to display the newly created custom character to the LCD, it is as simple as is displaying any other character, just send the character location to the LCD and it shows up!
Understanding how to use the custom character generator ram inside the HD44780 LCD module will take a little bit of effort on your part, so just read through the theory as described below, refer to the datasheet and you'll get a good idea of what is happening and how to implement it.
There are two sizes of fonts that this LCD module can display, 5x8 and 5x10. For this tutorial we will use an example 5x8 custom character. Above you can see a smiley face I have drawn inside of a 5x8 pixel grid. Next to the pixel image I have the binary encoding of the image. "0b" denotes a binary number in C/C++ and I will use that notation throughout the tutorial. The 1's represent a black pixel and the 0's represent a white pixel. Since The data bus is 8-bits wide, the upper 3 bits are not used, and should always be set to zero. The 5 lower bits are where the data for a specific line of the image is stored.
Now that we know what we want the character to look like and how to encode it in binary, we need to learn how to store the encoded image on the LCD. The LCD module has 8 memory locations (0b000 to 0b111) where characters can be stored. The smiley face image we're making will be character code 0b000 (seen above in the above 'character code' column). Each character code, has 8 addresses for the 8 lines of data of the image. So, we need to fill our specific character code (0b000) with the 8 lines of encoded image data.
To load the data of our image into the character code 0b000, we have to send the command telling the character generator ram which character and which line, and then send the actual data. This two-step process occurs 8 times, once for each line of data that needs to be put into the CGRAM (character generator RAM). There is a lot of binary work happening here, so take your time and don't get your 0's and 1's mixed up.
After the image data is loaded into the CGRAM, the data will stay there unless the LCD module is power cycled. So our custom image now resides at character location 0b0000 0000. If you want to display the newly created custom character to the LCD, it is as simple as is displaying any other character, just send the character location to the LCD and it shows up!