Schematic Overview
The schematic for this project is not terribly complex, however it is very important that you understand the circuit board and how it operates because of the high voltages that are generated. Below is a 'rough draft' schematic of the camera used for this project.
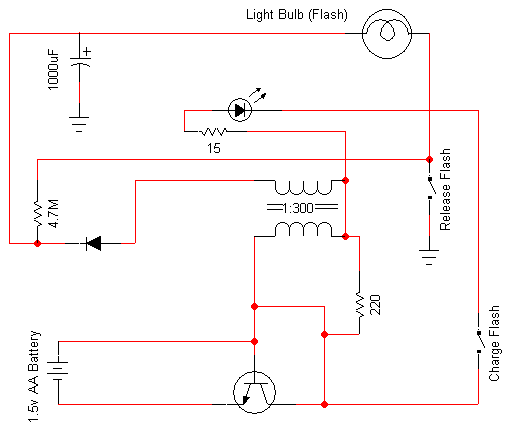
Schematic Specifics
Basic Operation
The schematic seen above isn't complete, however the general idea of the circuit is seen within it. The way it works is during the idle state when nothing is being pressed, nothing happens electrically. This is because power and gnd have no way of getting to each other. When either the charge flash or release flash switches are triggered this fact changes and cool things start happening. Either a picture is taken or the flash capacitor charges.
The 1000uF Capacitor
This is a very large capacitor. It can be dangerous when fully charged, enough so that you should definitely discharge it by touching both leads with the tip of a screwdriver (with an insulated handle). The reason such a large capacitor is needed is because of the large amount of current necessary to create the bright flash seen when a photo is taken.
The Release Flash Switch
This switch is triggered right as a photo is to be taken. The actual switch cannot be seen unless you take apart the camera. Then you'll see that the button used to take the picture actually does two things; takes the picture & releases the flash simultaneously.
The Charge Flash Switch
This is another push button that you hold down to charge the capacitor. In this project we'll instead remove the capacitor and use a normal SPST switch so as to allow constant current flow where the capacitor used to be as opposed to momentary current flow when the flash button is pressed.
The schematic for this project is not terribly complex, however it is very important that you understand the circuit board and how it operates because of the high voltages that are generated. Below is a 'rough draft' schematic of the camera used for this project.
Schematic Specifics
Basic Operation
The schematic seen above isn't complete, however the general idea of the circuit is seen within it. The way it works is during the idle state when nothing is being pressed, nothing happens electrically. This is because power and gnd have no way of getting to each other. When either the charge flash or release flash switches are triggered this fact changes and cool things start happening. Either a picture is taken or the flash capacitor charges.
The 1000uF Capacitor
This is a very large capacitor. It can be dangerous when fully charged, enough so that you should definitely discharge it by touching both leads with the tip of a screwdriver (with an insulated handle). The reason such a large capacitor is needed is because of the large amount of current necessary to create the bright flash seen when a photo is taken.
The Release Flash Switch
This switch is triggered right as a photo is to be taken. The actual switch cannot be seen unless you take apart the camera. Then you'll see that the button used to take the picture actually does two things; takes the picture & releases the flash simultaneously.
The Charge Flash Switch
This is another push button that you hold down to charge the capacitor. In this project we'll instead remove the capacitor and use a normal SPST switch so as to allow constant current flow where the capacitor used to be as opposed to momentary current flow when the flash button is pressed.