Schematic Overview
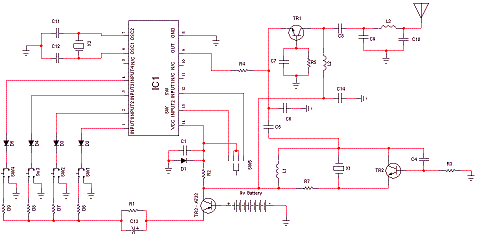
The first schematic that we'll look at is the base schematic of the transmitter without any modification. The RC car's transmitter circuit has two halves to it. One side (on the left) is pretty much all digital. When a switch(1-4) is pressed, IC1 becomes active and an encoded PWM (pulse with modulation) signal is output .

View Full Schematic
Schematic Specifics
Power Circuit
The packaging for the transmitter required a 9v battery to be used. Since we're wise in the ways of circuits and see that this circuit can operate as long as the IC has enough power to function, we'll just use +5v off the LM7805.
Control Switches, SW1-SW4
These switches control what the car does. Move forward, backward, left or right. Look carefully at where the switches are connected to ground. When the switch is pressed ground is connected. These are the key spots to making the microcontroller able to control what the transmitter outputs. We'll see what connects to them on the next schematic.
RF Amplifier, Signal Mixing & Output
The crystal labeled X1 is actually a 27MHz oscillator. This will generate the frequency signal that the IC1 output will be modulated to (Toy RC cars are allowed to be on either 27MHz or 49 MHz frequency channels). The signal mixing occurs directly after the R4 Resistor approaching the output transistor (TR1). Output finally occurs after all that and is relatively low power (mW range). Understanding this circuit is not crucial to creating this project.
IC1
Just a small note. IC1 is unknown. What exactly it is, is not directly clear as there is a nice glab of black crap right over it. My best guess is it is either a microcontroller or encoder as it outputs an encoded PWM signal to be modulated. If you switch the 3-way switch on the transmitter the encoding changes (this is to allow 3 cars to be able to be controlled simultaneously).
The first schematic that we'll look at is the base schematic of the transmitter without any modification. The RC car's transmitter circuit has two halves to it. One side (on the left) is pretty much all digital. When a switch(1-4) is pressed, IC1 becomes active and an encoded PWM (pulse with modulation) signal is output .

View Full Schematic
Schematic Specifics
Power Circuit
The packaging for the transmitter required a 9v battery to be used. Since we're wise in the ways of circuits and see that this circuit can operate as long as the IC has enough power to function, we'll just use +5v off the LM7805.
Control Switches, SW1-SW4
These switches control what the car does. Move forward, backward, left or right. Look carefully at where the switches are connected to ground. When the switch is pressed ground is connected. These are the key spots to making the microcontroller able to control what the transmitter outputs. We'll see what connects to them on the next schematic.
RF Amplifier, Signal Mixing & Output
The crystal labeled X1 is actually a 27MHz oscillator. This will generate the frequency signal that the IC1 output will be modulated to (Toy RC cars are allowed to be on either 27MHz or 49 MHz frequency channels). The signal mixing occurs directly after the R4 Resistor approaching the output transistor (TR1). Output finally occurs after all that and is relatively low power (mW range). Understanding this circuit is not crucial to creating this project.
IC1
Just a small note. IC1 is unknown. What exactly it is, is not directly clear as there is a nice glab of black crap right over it. My best guess is it is either a microcontroller or encoder as it outputs an encoded PWM signal to be modulated. If you switch the 3-way switch on the transmitter the encoding changes (this is to allow 3 cars to be able to be controlled simultaneously).