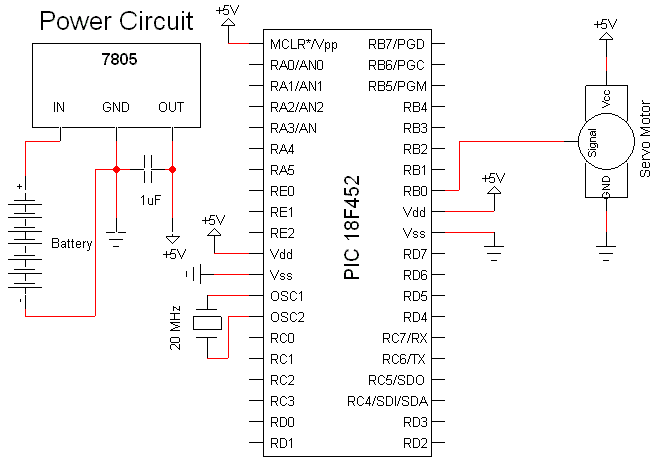
The Single Servo Schematic
Although we'll be using the Olimex P-40 development board, you can also breadboard out the circuit as it is very simple. The schematic for our first pass at controlling a servo is shown below. Servos can start to sink alot of current like any motors so it is wise to be sure that your batteries can handle high currents. Since we're only using 1 or 2 servos, current won't be an issue.
Click to Enlarge:

You may have noticed that the servos we're using are rated at 4.8v & 6v. We're hooking 5v to the
servos in this tutorial just to make things easier. This will not harm the servos in any way. They can be
safely operated between 4.8 and 6 volts. The increase in voltage gives the servos more torque.
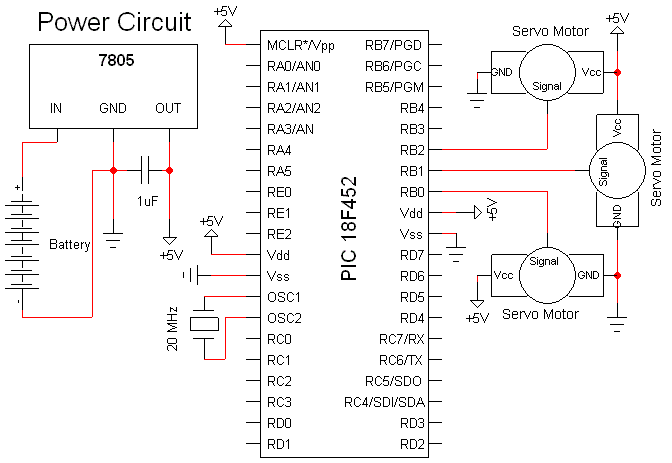
The Multi Servo Schematic
One thing about robotics is that you are never ever doing only 1 thing at a time. When it comes to using servos in robotics it is very common that your project will have 2, 3 or even 4 servos that need to be operated at once. The multi servo schematic below is not very different from the single servo schematic above, but the software method for controlling the 3 servos simultaneously is intuitively different. We'll go over this in detail in the next section.
Click to Enlarge:

3 Pins are used to output control PWM signals to the 3 servos. RB0, RB1 & RB2. Don't forget these names because in the next section we'll see them again.
Although we'll be using the Olimex P-40 development board, you can also breadboard out the circuit as it is very simple. The schematic for our first pass at controlling a servo is shown below. Servos can start to sink alot of current like any motors so it is wise to be sure that your batteries can handle high currents. Since we're only using 1 or 2 servos, current won't be an issue.
Click to Enlarge:
The Multi Servo Schematic
One thing about robotics is that you are never ever doing only 1 thing at a time. When it comes to using servos in robotics it is very common that your project will have 2, 3 or even 4 servos that need to be operated at once. The multi servo schematic below is not very different from the single servo schematic above, but the software method for controlling the 3 servos simultaneously is intuitively different. We'll go over this in detail in the next section.
Click to Enlarge:
3 Pins are used to output control PWM signals to the 3 servos. RB0, RB1 & RB2. Don't forget these names because in the next section we'll see them again.