Setup The File Server
After we have installed the base system, we can now install the necessary packages to connect to the machine from other computers. The package we need is called Samba. Once it is installed, we will set it up so that your host machine can access its files like a local hard drive (or at least look like it).
On your server machine, log in as the user we created and prepare for command-line goodness!
Note: Commands and input to be typed by the user are in black. Messages from the system are greyed out.
First, we'll set up the super user (for information on what this is, go here):
Note: You will notice the command "sudo" appears often before the commands you need to type. sudo is a command that stands for "super user do" and it allows users to run programs with the security privileges of another user (in our case, superuser/root).
You probably don't want to use the same password for your user account as you do for root, but for this example, I will use the same password.
Next, we'll make sure your system is up-to-date with the latest packages. First, we'll make sure you have access to all the package repositories.
Open the sources.list file:
Once you have the file open, comment out the line that says "deb cdrom:[Kubuntu 7.10 _Gutsy Gibbon_ - Release i386 (20071016.2)]/ gutsy main restricted" by adding a '#' to the front of it (you must first press 'i' or Insert to edit a file in vim). Then scroll down a bit (by pressing the down arrow key on your keyboard) and uncomment the lines for the 'Backports' repository and the 'Partner' repository. Then press ESC and type ":wq" to write the file and exit.
Next we will update your package list:
A whole bunch of text will be listed.
Now, we'll upgrade any packages that are upgradeable:
When it asks if you wish to continue with the installation, hit 'Y' and let it do its thing.
Now that the system is up to date, we'll install the ssh server to allow us to connect remotely:
Next, we'll install the samba and smbfs packages:
Once those are finished installing, it's time to add a Samba user so we can connect to the server and play with the files:
Again, you may want to choose an alternate password for this but I will again choose the same one.
Next, we have to edit the samba configuration file:
While you are inside the smb.conf file, scroll down until you see the line "workgroup = MSHOME." Change this to whatever the name of your network is. I'm using "WORKGROUP" myself so I will edit the line to be "workgroup = WORKGROUP." Next, scroll down to the Share Definitions section.
Uncomment the following lines:
And uncomment the line:
And edit the lines regarding create and directory masks to the following:
Write and exit the file and then restart your samba server:
And now we're done on the file server machine! Feel free to disconnect the monitor, keyboard, and mouse because we won't need them any more (you must change a setting in the BIOS to allow your machine to boot up without a keyboard if you ever want to reboot the machine -- but since it's Linux, why would we ever need to reboot?). You can use an SSH client on the host machine to connect to the server from now on. I use PuTTY myself and would advise others to use it.
Setup The Host Machine
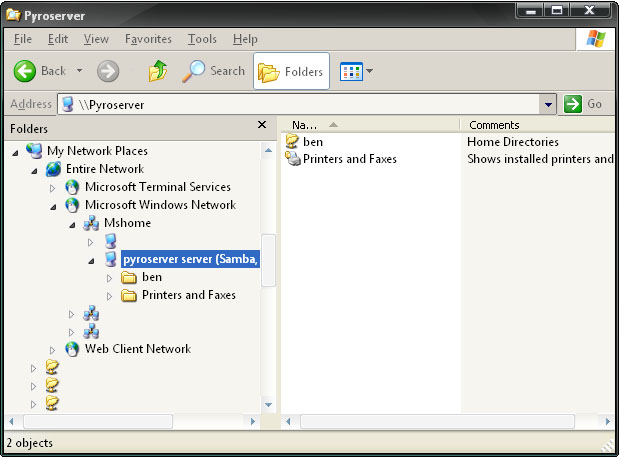
Now that the server is ready to go, let's connect to it with our host machine! Open Windows Explorer and type your server's name into the Address bar to see if it works. It should! If it does, it will look something like this:

Next, we'll mount it as a network drive. In Windows Explorer, go to Tools > Map Network Drive and type your server name and user name (for me, I typed: "\\Pyroserver\ben") for the folder. Check the box that says "Reconnect at logon" and you are set! You should now see it listed in your Windows Explorer as a network drive.
After we have installed the base system, we can now install the necessary packages to connect to the machine from other computers. The package we need is called Samba. Once it is installed, we will set it up so that your host machine can access its files like a local hard drive (or at least look like it).
On your server machine, log in as the user we created and prepare for command-line goodness!
Note: Commands and input to be typed by the user are in black. Messages from the system are greyed out.
First, we'll set up the super user (for information on what this is, go here):
ben@pyroserver:~$ sudo passwd root

                            [sudo] password for ben: pyro

                            Enter new UNIX password: pyro

                            Retype new UNIX password: pyro

                            passwd: password updated successfully
Note: You will notice the command "sudo" appears often before the commands you need to type. sudo is a command that stands for "super user do" and it allows users to run programs with the security privileges of another user (in our case, superuser/root).
You probably don't want to use the same password for your user account as you do for root, but for this example, I will use the same password.
Next, we'll make sure your system is up-to-date with the latest packages. First, we'll make sure you have access to all the package repositories.
Open the sources.list file:
ben@pyroserver:~$ sudo vim /etc/apt/sources.listOnce you have the file open, comment out the line that says "deb cdrom:[Kubuntu 7.10 _Gutsy Gibbon_ - Release i386 (20071016.2)]/ gutsy main restricted" by adding a '#' to the front of it (you must first press 'i' or Insert to edit a file in vim). Then scroll down a bit (by pressing the down arrow key on your keyboard) and uncomment the lines for the 'Backports' repository and the 'Partner' repository. Then press ESC and type ":wq" to write the file and exit.
Next we will update your package list:
ben@pyroserver:~$ sudo apt-get updateA whole bunch of text will be listed.
Now, we'll upgrade any packages that are upgradeable:
ben@pyroserver:~$ sudo apt-get upgradeWhen it asks if you wish to continue with the installation, hit 'Y' and let it do its thing.
Now that the system is up to date, we'll install the ssh server to allow us to connect remotely:
ben@pyroserver:~$ sudo apt-get install
                            openshh-server
Next, we'll install the samba and smbfs packages:
ben@pyroserver:~$ sudo apt-get install samba smbfsOnce those are finished installing, it's time to add a Samba user so we can connect to the server and play with the files:
ben@pyroserver:~$ sudo smbpasswd -a 'ben'

                            New SMB password: pyro

                            Retype new SMB password: pyro
Again, you may want to choose an alternate password for this but I will again choose the same one.
Next, we have to edit the samba configuration file:
ben@pyroserver:~$ sudo vim /etc/samba/smb.confWhile you are inside the smb.conf file, scroll down until you see the line "workgroup = MSHOME." Change this to whatever the name of your network is. I'm using "WORKGROUP" myself so I will edit the line to be "workgroup = WORKGROUP." Next, scroll down to the Share Definitions section.
Uncomment the following lines:
[homes]

                               comment = Home Directories

                               browseable = yes
And uncomment the line:
writable = yesAnd edit the lines regarding create and directory masks to the following:
create mask = 0775

                            directory mask = 0775
Write and exit the file and then restart your samba server:
ben@pyroserver:~$ sudo /etc/init.d/samba restartAnd now we're done on the file server machine! Feel free to disconnect the monitor, keyboard, and mouse because we won't need them any more (you must change a setting in the BIOS to allow your machine to boot up without a keyboard if you ever want to reboot the machine -- but since it's Linux, why would we ever need to reboot?). You can use an SSH client on the host machine to connect to the server from now on. I use PuTTY myself and would advise others to use it.
Setup The Host Machine
Now that the server is ready to go, let's connect to it with our host machine! Open Windows Explorer and type your server's name into the Address bar to see if it works. It should! If it does, it will look something like this:
Next, we'll mount it as a network drive. In Windows Explorer, go to Tools > Map Network Drive and type your server name and user name (for me, I typed: "\\Pyroserver\ben") for the folder. Check the box that says "Reconnect at logon" and you are set! You should now see it listed in your Windows Explorer as a network drive.