Schematic Overview
The schematic is very simple for this tutorial. It is just a matter of wiring up the ADXL320 sensor to the PIC and the LED. The power circuitry assumes you have a battery of +5v to power the PIC. You can create your own custom circuitry for this or just use a battery array...whatever you like.
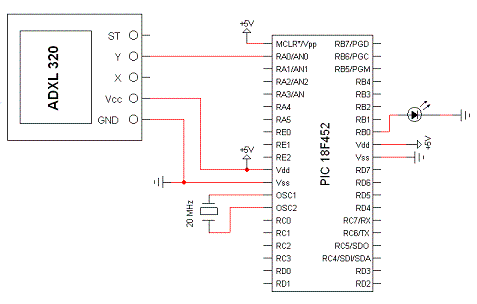
Schematic Specifics
PIC Microcontroller
The PIC is the brains of the circuit. Using the A/D's on the PIC data samples will be taken as input and then evaluated. Based off different inputs the LEDs will blink faster or slower to show how much the board has been tilted or accelerated.
ADXL320 Accelerometer
This sensor will output an analog signal to the PIC to be interpreted. The signal is measured by its change in voltage when you want to find out how many g's are currently being 'pulled'.
LED Blinking Circuit
This is just one single LED added to the circuit. Depending on how fast it is blink will tell us how much acceleration or tilt is being applied to the ADXL320 sensor. This will of course all be done in software in the PIC.