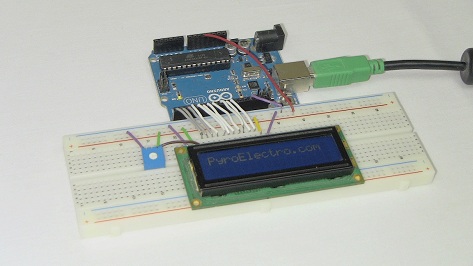
An Overview Of The 16x2 LCD To Arduino Interface
Overall, this article might not seem the most impressive with the large amount of quadcopters, laser cutting and autonomous vehicle articles on the web, but if you're just starting out in electronics, getting the simple things to work first can often feel like the most frustrating and de-motivating. This article was meant to give a good, clear and concise demonstration of how to connect a simple 16x2 LCD to an Arduino UNO and get it working, fast!
What To Do Now
Once you've reached this point and have a working LCD to Arduino interface, the fun has only begun. You can continue forward and connect up a sensor and spit out its value on the LCD. Or you can look into the other advanced functions that the Arduino LCD library offers like building your own custom characters.
Conclusion
Even though we've built LCD interfaces with FPGAs and PICs before, every new system has some custom need because it's different than the previous one and the Arduino is no differently. Admittedly in comparison the Arduino's built in LCD libraries made getting started a breeze, so I can only hope that it is just as easy for everyone else following this article. I hope the data section convinced you that this article was successful in its modest goals laid out in the introduction and hope you all enjoyed reading this article!
If you have any further questions, I implore you...don't be shy, take a look at the forums or ask a question there. I check them out regularly and love getting comments & questions.
Overall, this article might not seem the most impressive with the large amount of quadcopters, laser cutting and autonomous vehicle articles on the web, but if you're just starting out in electronics, getting the simple things to work first can often feel like the most frustrating and de-motivating. This article was meant to give a good, clear and concise demonstration of how to connect a simple 16x2 LCD to an Arduino UNO and get it working, fast!

What To Do Now
Once you've reached this point and have a working LCD to Arduino interface, the fun has only begun. You can continue forward and connect up a sensor and spit out its value on the LCD. Or you can look into the other advanced functions that the Arduino LCD library offers like building your own custom characters.
Conclusion
Even though we've built LCD interfaces with FPGAs and PICs before, every new system has some custom need because it's different than the previous one and the Arduino is no differently. Admittedly in comparison the Arduino's built in LCD libraries made getting started a breeze, so I can only hope that it is just as easy for everyone else following this article. I hope the data section convinced you that this article was successful in its modest goals laid out in the introduction and hope you all enjoyed reading this article!
If you have any further questions, I implore you...don't be shy, take a look at the forums or ask a question there. I check them out regularly and love getting comments & questions.